


Aadhaar Correction Form
The Aadhaar Correction Form is the official UIDAI form used to fix errors in your name, address, date of birth or other Aadhaar details. You can submit it online through the myAadhaar portal or offline at an Aadhaar Enrolment Centre, depending on which detail needs correcting. This page covers the process, documents, fees and common reasons corrections get rejected.

What is the Aadhaar Correction Form?
The Aadhaar Correction/Update Form serves both enrolment and correction purposes. It captures details such as your Pre‑enrolment ID, name, gender, age or date of birth, address, relationship (for minors), and mobile/email contact. You must also declare which documents you are submitting as proof (POI, POA, DOB, POR)
Important Recent Updates & Rules
- UIDAI CEO has announced stricter rules for date of birth and biometric changes, limiting repeated changes and linking verification to official databases (PAN, CBSE, MGNREGA) with AI/ML safeguards against fraud.
- UIDAI now allows women to update their name and relationship (e.g. father’s to husband’s name) after marriage via a dedicated government app—no centre visit required for certain updates.
- UIDAI requires a child's biometrics (photo, fingerprints, iris scan) to be updated at age 5 and again at age 15; missing these mandatory updates can lead to Aadhaar deactivation. The update normally costs Rs.125, but UIDAI has waived this fee for children aged 7–15 until 30 September 2026.
How to Submit Aadhaar Correction Request Online?
Online submission is available for address updates when your mobile is linked to Aadhaar. This is done through UIDAI's myAadhaar self-service portal. The process involves:
Step 1 - Visit official website of UIDAI.
Step 2 - Enter the Aadhaar number and captcha details.
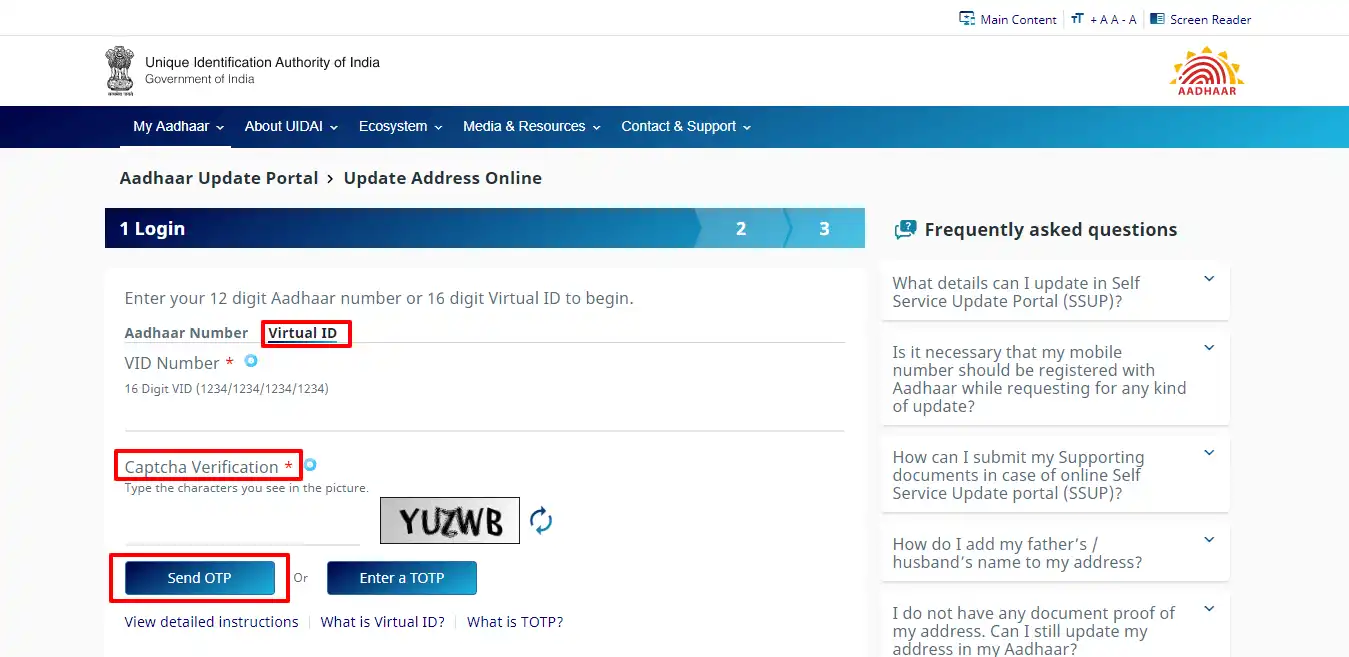
Step 3 - Click on 'Send OTP'.
Step 4 - Enter the OTP that you have received on your registered mobile number and click on 'Submit'.
Step 5 - On the next page, you will find the below-mentioned options:
a. Update Address via Address Proof
b. Update Address via Secret Code (this is if you already have an Address Validation Letter)
Step 6 - If you select option one, the existing address will be shown along with a space for you to type the new address.
Step 7 - Enter the relevant details and click on 'Preview'.
Step 8 - You will have the option to edit the details or submit them.
Step 9 - Next, you must upload an original scanned copy of a valid proof of address.
Step 10 - Following upload, you will be given an Update Request Number (URN). The number can be used to monitor the request's progress.
Submit Aadhaar Correction Form Offline
The procedure to submit the Aadhaar Correction Form at an Aadhaar Enrolment Centre is mentioned below.
Step 1 - Visit the nearest Aadhaar Enrolment Centre and request the form. You can also download the Aadhaar Correction Form.
Step 2 - Ensure that you carry the original documents when you visit the Aadhaar Enrolment Centre.
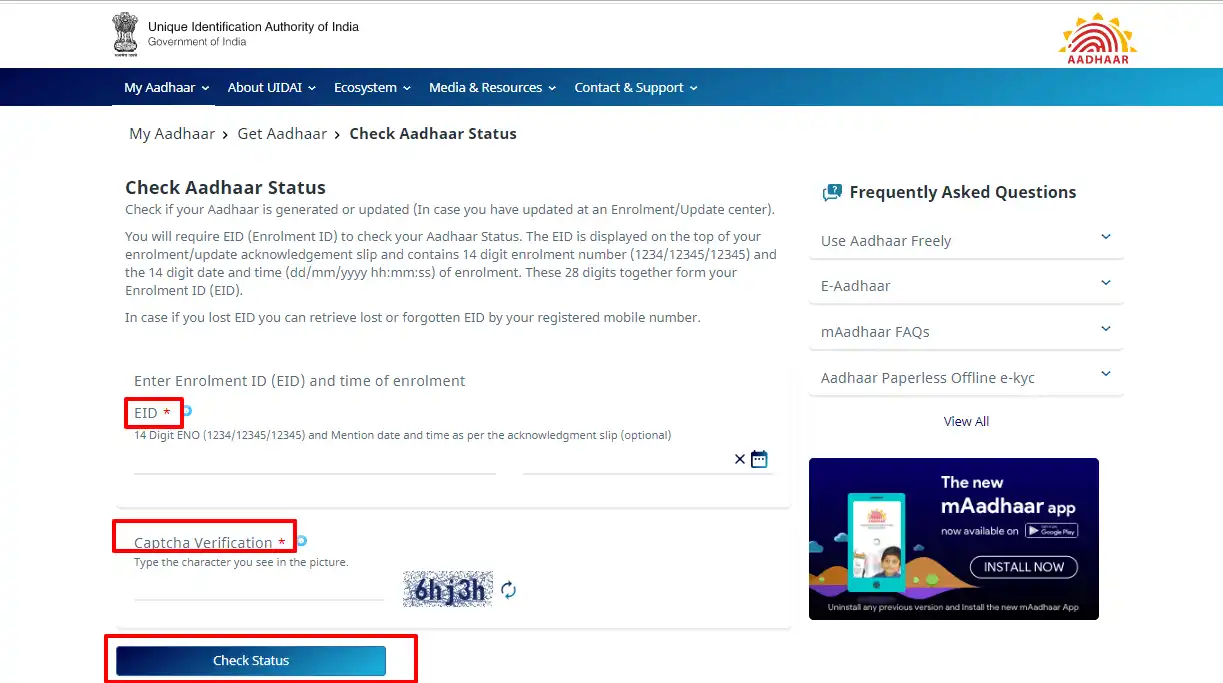
Step 3 - The operator will check the information you provided when you submit the form. There will be an acknowledgment given along with the EID indicated in it. The EID can be used to monitor the request's progress.
Instructions for Filling Aadhaar Correction Form
The Aadhaar Enrolment/Correction Form is available at Enrolment or Update Centres and also in PDF form on the UIDAI website. This is how the form looks.
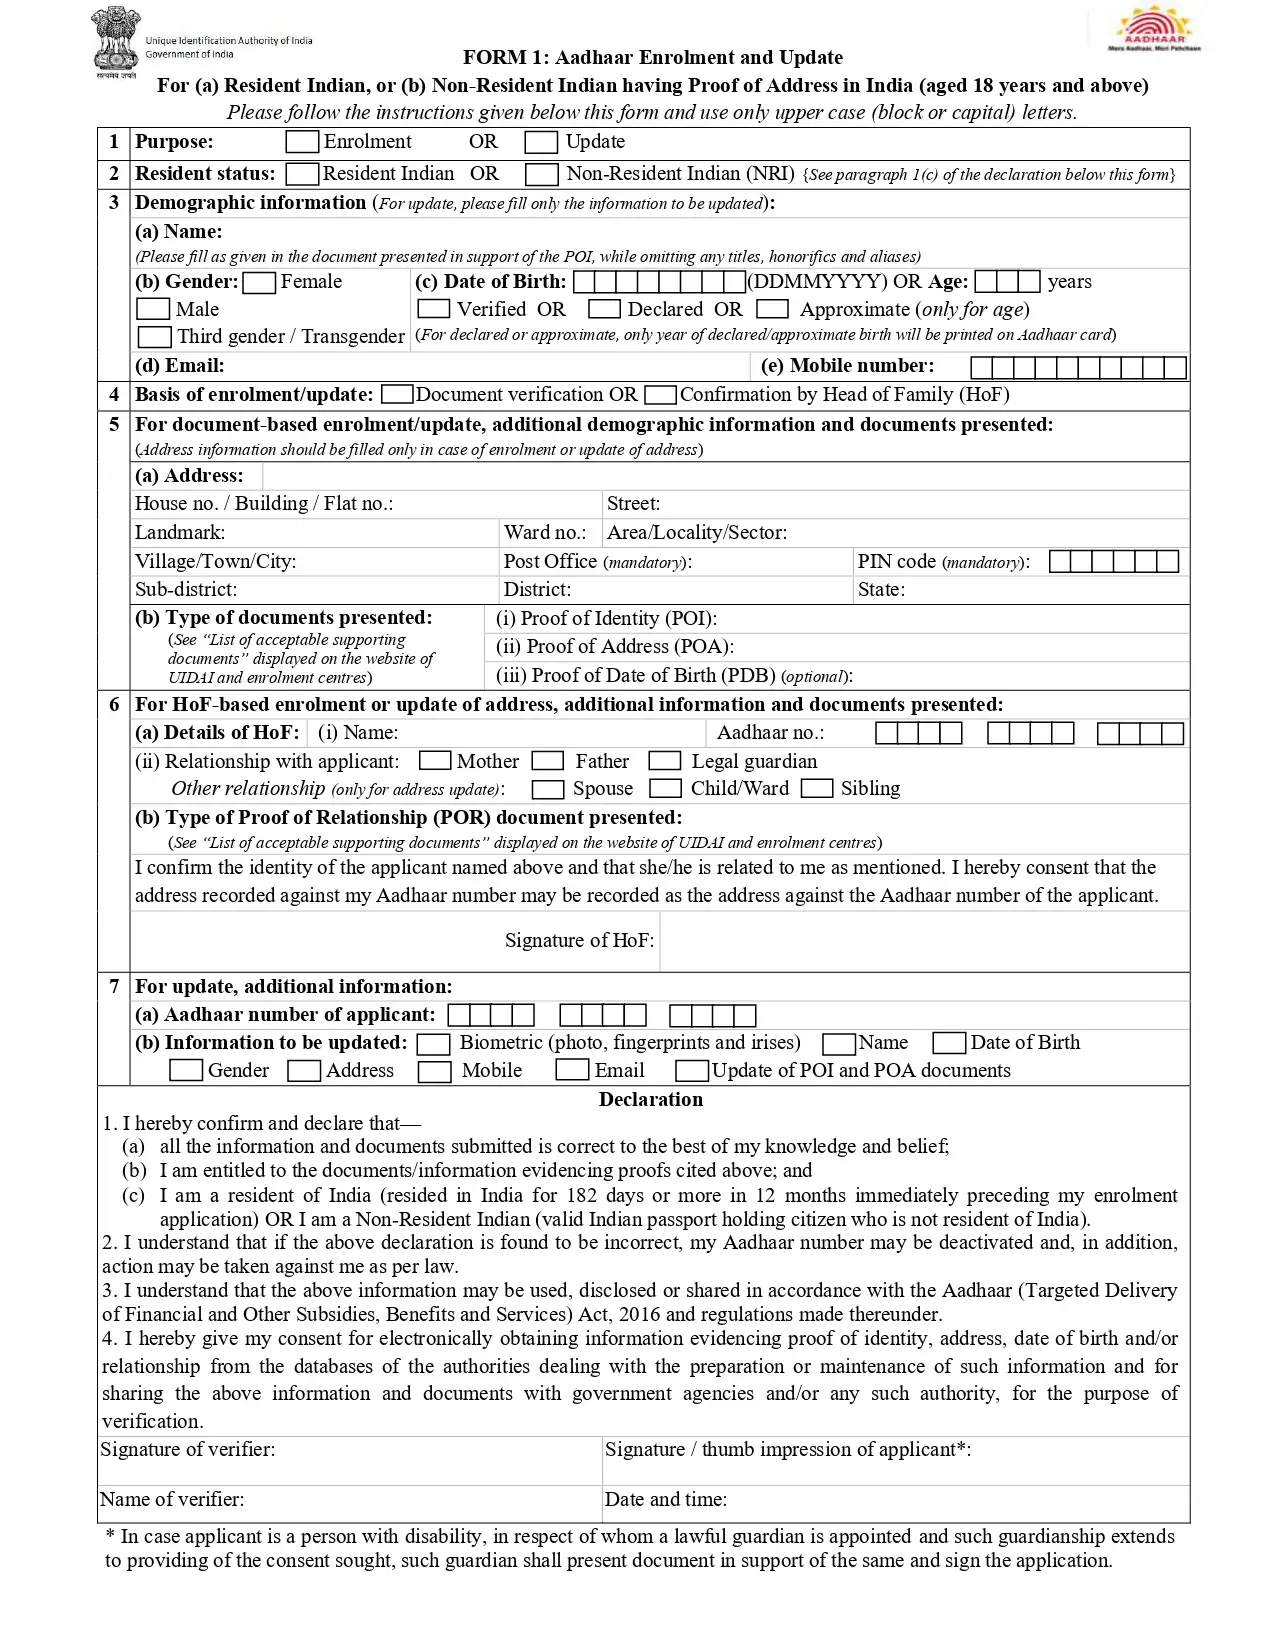
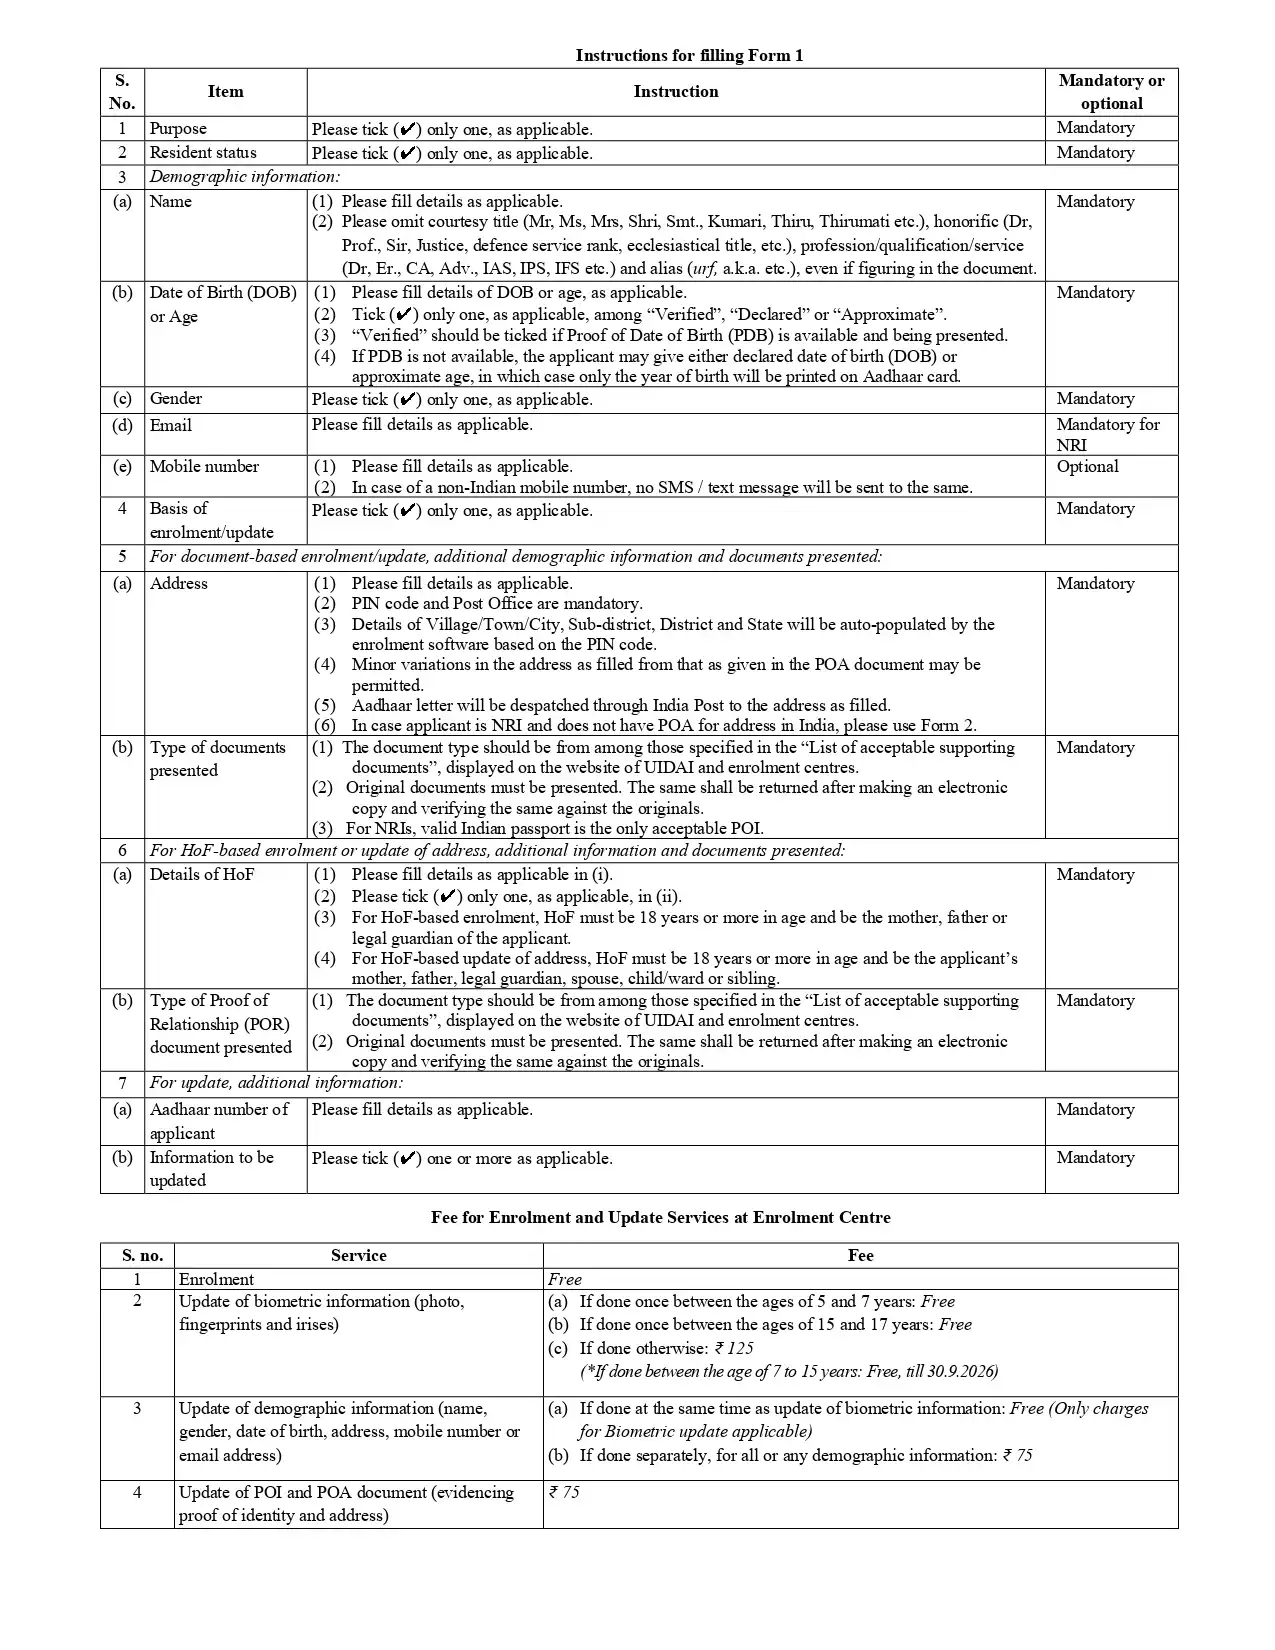
You might be unsure about what information to fill out when filing a correction or rectification request because the enrollment and correction forms are same. A simple rule to follow is to fill in only the following information:
- The 28-digit Enrolment ID (EID) consisting of the enrolment number and date & time stamp
- Your name
- Only the field or fields that need to be corrected
Detailed instructions on filling out the enrolment/correction form can be found on page 2 of the PDF available on the UIDAI website.
What are the various Details that can be Updated through Online and Offline process?
The following are the details that an individual can update through online and offline modes
By Online Process
- Name (minor changes)
- Date of birth
- Address
- Gender
By Offline Process
- Demographic data
- Mobile number
- Email ID
Supported Documents for Aadhaar Correction Form
The POA documents that can be submitted are mentioned below:
PoA (Proof of Address):
- Account statement or passbook of the Post Office.
- Ration card.
- Voter Identification card.
- Statement of a bank.
- Bank passbook.
- Passport.
- Driving license
- Past three months water, electricity bill, or telephone bill.
- Insurance policy.
- Photo identity card issued by the government.
- Service photo ID card issued by PSU.
- Pensioner card.
- Freedom fighter card.
- CGHS card, etc.
PoI (Proof of Identification):
- Diving license.
- Passport.
- Voter card.
- ECHS Photo card.
- Photo identity card issued by the government or PSU.
- Marriage document.
- Handicapped medical certificate or a disability Identification card.
- Recognised Educational Institution-issued photo identification proof.
- Kisan passbook, etc.
DoB (Date of Birth):
- Birth certificate,
- valid Indian passport,
- marksheet or certificate from a recognised educational institution,
- a Central/State Government or PSU service photo ID card, pensioner photo ID or Freedom Fighter photo ID/Pension Payment Order, or a Third gender/Transgender Identity Card.
- Anyone under 18 must submit a birth certificate (NRIs under 18 may submit a birth certificate or Indian passport instead).
PoR (Proof of Relationship):
- Birth certificate,
- marriage certificate,
- a document proving legal guardianship (issued under the Guardians and Wards Act 1890, the National Trust Act 1999, or the Rights of Persons with Disabilities Act 2016), or a self-declaration from an immediate family member (for borrowing that family member's address).
Fields in the Aadhaar Update Form and their Meanings
Here is a description of each field in the form, so that you are clear about what to fill and what not when required.
1. Name
This should contain your full name as you are legally known, but without any titles or salutations such as Ms., Mr., Shri, or Dr. You need to substantiate your name with valid proof of identity such as Passport, PAN Card, Driving Licence, etc. UIDAI also gives a detailed list of documents you can use as proofs of Aadhaar enrolment, correction, or update.
You are allowed to make minor changes in the spelling of your name without really changing the name. For example, if your name is spelled as 'Rithika' and you want to make the spelling 'Ritika', you can do that without having to provide additional proof.
2. Gender
Pick what gender you belong to - Male, Female, or Transgender.
3. Age OR Date of Birth (DoB)
The birthdate must be provided using the format DDMMYYYY, thus if you were born on 26 August 1959, your submission would be 26 08 1959. You can provide the approximate age in years if you, an elderly family member, or another person knows the actual date of birth (not months).
If you have proof of your date of birth in the form of documents, check the box next to "Verified," and if not, choose 'Declared.'
4. Address
Write your address in full, and don't forget to carry your original proof of address to the enrolment centre for verification. The address is very important because the card will be sent here. If you make an error in the address, then you will not receive your Aadhaar card.
You can choose C/o (care of), D/o (daughter of), S/o (son of), W/o (wife of), or H/o (husband of), if you want to include the name of a parent, a guardian, or spouse, along with your address. Just like in the name field, you can make minor changes as long as the core address is the same as the proof you provide.
This section also includes your mobile number and email address. The number and email id you provide here will become your registered number and registered email id.
5. Relationship
The name and Aadhaar number of the parent or legal guardian must be included in the application if the Aadhaar applicant is a kid under the age of five. But, adults are not required to read this section.
6. Documents
Mention the documents that you will be submitting as POI (Proof of Identity), POA (Proof of Address), DOB (Date of Birth), and POR (Proof of Relationship).
7. Using Introducer/HoF
If you don't have any proof of identity and/or address and are using verification based on the Head of the Family (Hof) or Introducer, then you must provide the Aadhaar or EID number of the HoF or Introducer.
Read More detail on Aadhaar Card Update or Correction
Fees for Aadhaar Correction/Updation
Updates made online through UIDAI's myAadhaar portal are free until 14 June 2027.
Updates made offline at an Aadhaar Enrolment Centre currently cost Rs.75 for demographic changes (name, address, date of birth, gender) and Rs.125 for biometric/photo updates; biometric updates stay free for children aged 7–15 until 30 September 2026.
(Fees as of 23 September 2026, verified against UIDAI's official fee schedule)
Do's and Don'ts when Filling Aadhaar Card Update Form
Now that you know how to fill out a correction form for Aadhaar and how to submit the form, here are some quick notes on what to do and what not to do when filling out or submitting an Aadhaar Correction Form.
- Use only capital letters when filling out the form.
- Fill in all the fields that need to be corrected.
- Fill out the Aadhar Card Update Form with valid and current details.
- Enter your complete address and the candidate's mobile number.
- Select the same language option used during enrolment.
- Use the correct salutations such as Mr./Dr./Col., etc.
- Attach the correct supporting document.
- Provide copies certified by a gazetted officer or a public notary if original documents are not available.
Note: The Application may get rejected if incorrect or unverifiable information is submitted.
- Don't use lowercase or mixed-case letters where the form specifies capitals.
- Don't leave any field you're correcting blank.
- Don't submit outdated or mismatched details across your documents.
- Don't leave your address or mobile number incomplete.
- Don't select a different language than the one used at enrolment.
- Don't skip your salutation (Mr./Dr./Col., etc.) if the form requires it.
- Don't attach the wrong or an unrelated supporting document.
- Don't submit uncertified copies if you don't have the originals - get them certified by a gazetted officer or notary first.
Common Reasons for Rejection of Aadhaar Card Update or Correction Request
The following are the reasons for the rejection of correction or update request for Aadhaar:
- Documents sent to UIDAI were not self-attested.
- Details mentioned in the form not matching with the documents provided for verification.
- Lack of adequate documents provided for verification.
What Happens After Submission?
Once the form and documents are verified, you receive an acknowledgement slip with URN/SRN. Corrections are processed within approximately 7–10 working days, and you may track the status on UIDAI’s website using the reference number. Your Aadhaar number remains unchanged. The updated card is delivered to your registered address or can be downloaded online once approved.
Summary
The Aadhaar Correction Form lets you fix errors in your name, address, date of birth and other demographic details, either online through UIDAI's myAadhaar portal or offline at an Aadhaar Enrolment Centre.
Keep your supporting documents ready, since incomplete or mismatched proof is the most common reason corrections get rejected. Your Aadhaar number stays unchanged throughout, and once approved, the updated card is delivered to your registered address or made available for download.
Aadhaar Resources
- Unique Identification Authority of India
- Aadhar Card Download
- Aadhar Card Status Update
- Aadhar Card Update
- Documents Required for Aadhar
- Link Aadhaar With Mobile
- Aadhar Password
- Register Mobile Number with Aadhaar
- Aadhar Card Correction Form
- Aadhar Enrolment Centers
- Aadhar Customer Care Numbers
- Check Aadhar Status
- Aadhar Verification
- Lost Aadhar Card
- Aadhar Card Online Registration
Disclaimer
FAQs on Aadhaar Correction Form
1.What are the different methods to submit an Aadhaar Correction Form?
The Aadhaar Correction Form can be submitted online through UIDAI's self-service portal or in person at an Aadhaar Enrolment Centre. Online submission works only for certain fields and needs your mobile number linked to Aadhaar, while the enrolment centre accepts corrections to demographic and biometric details alike.
2.How can I send my Aadhaar Correction Form by post?
You can download the Aadhaar Correction Form from the UIDAI website or collect it from an Aadhaar Enrolment Centre, fill in the details that need correcting along with the required supporting documents, and post it to UIDAI's designated processing address given on the form. UIDAI then dispatches the corrected Aadhaar card to the address mentioned on the form.
3.How do I link my mobile number so I can submit the Aadhaar Correction Form online?
Visit your nearest Aadhaar Enrolment Centre with a filled Aadhaar Correction Form and provide your mobile number; no supporting documents are required for this registration. You can also complete this step through India Post's Aadhaar services.
4.Does my Aadhaar number change after I submit an Aadhaar Correction Form?
No, your Aadhaar number stays the same no matter what corrections you make through the Aadhaar Correction Form. Only the specific details you update, such as your name, address or date of birth, change on the card.
5.Do I need to carry original documents when submitting the Aadhaar Correction Form at an Enrolment Centre?
Yes, original documents are mandatory when you submit the Aadhaar Correction Form in person. The centre will not process your correction without them.
6.Can I submit the Aadhaar Correction Form online if my mobile number isn't linked to my Aadhaar?
No, your mobile number must already be linked to your Aadhaar before you can use the online Aadhaar Correction Form process. Without this link, you'll need to visit an Aadhaar Enrolment Centre instead.
7.Can biometric details be changed using the online Aadhaar Correction Form process?
No, biometric updates such as fingerprints, iris scans and photographs cannot be changed online. These require an in-person visit to an Aadhaar Enrolment Centre using the offline Aadhaar Correction Form process.
8.Can I fill the Aadhaar Correction Form in my local language?
Yes, the Aadhaar Correction Form can be filled and submitted in the local language you originally used during enrolment. Matching the language to your existing Aadhaar record helps the update go through smoothly.
9. Can I use the Aadhaar Correction Form to update my child's address?
Yes, a child's address can be updated using the Aadhaar Correction Form with a parent's Aadhaar accepted as proof of address. This applies whether the update is made online or at an Aadhaar Enrolment Centre
10.Is a care-of (C/o) detail mandatory on the Aadhaar Correction Form's address field?
No, adding a care-of (C/o) detail on the Aadhaar Correction Form is optional and only needed if it helps with postal delivery. Your core address must still be complete and accurate.
11.Can a certificate from a local MP, MLA or gazetted official support my Aadhaar Correction Form?
Yes, UIDAI accepts certificates issued in its prescribed format by authorities such as an MP, MLA, MLC or gazetted officer as supporting documents for the Aadhaar Correction Form. See the document list on this page for the full set of accepted certifying authorities.

Disclaimer
Credit Card:
Credit Score:
Personal Loan:
Home Loan:
Fixed Deposit:


Copyright © 2026 BankBazaar.com.